 |
|
Reviews, updates and in depth guides to your favourite mobile games - AppGamer.com
|
|
Make A Photo Look Like The Joker? |
|
| Page: 1 | Reply |
| Nov 10th 2008 | #181334 Report |
 Posts: 1 |
Hi. I'm trying to get one of my photos to look like 'Joker' from the film 'The Dark Knight'. Can anyone help me out on this? Ive looked for tutorials on it, but its all to fast and not well explained at all. Thanks.  |
| Reply with Quote Reply | |
| Nov 11th 2008 | #181341 Report |
|
Posts: 13 |
Hmmm, I'm shocked. You mean you couldn't find any tutorials on "how to make my photo look like the Joker from Bat Man"?! Ha ha. Seriously dude, buy a photoshop book for beginners... there's really a lot of good ones out there. Go to any bookstore and you'll see 30 different books on Photoshop. that is how I learned, using online tutorials is fine, but many are confusing and filled with errors. |
| Reply with Quote Reply | |
| Nov 11th 2008 | #181342 Report |
|
Posts: 270 |
hi, myself i am a novice and not very good at this but maybe of some help... 1. first , looks like you been looking at video tutorials and sometime they can be too fast.... I was looking at this one... it good but way too fast.. fortuately there some text to help follw, if i was going to use this one... i would maybe download it and put it in slow mode.. smiling..... http://www.metacafe.com/watch/yt-SQ5s58K5gLU/joker_photoshop_tutorial/ 2. what you might look at is searching for clown tutorials!!!! now here you will get some video's but i think what important to you is the text/graphic tutorials.... on making a clown face , and that all the joker face is, a clown face!! .... I found this one.... it has all the basic elements the only thing missing... is that you want to keep the skin creases and highlight them..... http://www.webdesign.org/web/photoshop/photo-editing/clown-make-up.11651.html Now i was looking at this picture http://www.flickr.com/photos/_nijoker_/2703518885/ ... on your friend picture i think i would change his eyes to where there looking up... that relatively simple..... hope this helps |
| Reply with Quote Reply | |
| Nov 24th 2008 | #181435 Report |
|
Posts: 1 |
I made myself into the Joker in Photoshop... I've got a brief video on youtube of it here: http://www.youtube.com/watch?v=UmeYQHmtVbs and some pictures: 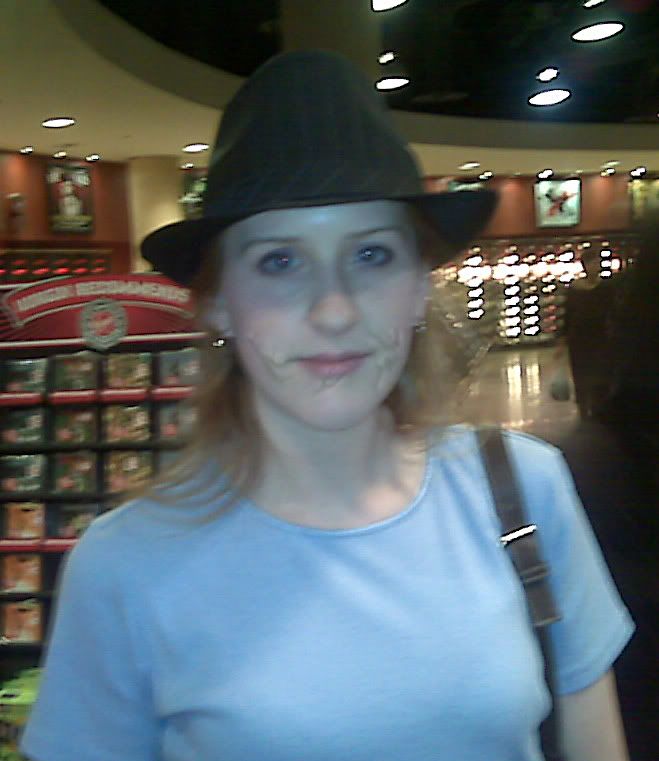  What I did for the scars was just playing around with different tools, mostly using a burn/dodge to create the shadow effects of the scars - but I don't use full exposure, I keep it way down so the skin color still comes through and it looks more realistic. Then I save the picture of the scars as a different file to work with the makeup (that way if I mess up I can still have the finished scars to go back to). To do the makeup I used the magic wand to select my face, then I adjust the brightness/contrast to make it whiter (I have light skin already so it wasn't difficult). Then I use a paintbrush with a fairly 'true' red color to do the lips, still keeping exposure/hardness low so it lets the scars show through. To darken the red I use the burn tool, and then I use the smudge tool to bring out the wrinkles and shading. The eyes I did with the paintbrush, burn tool, and blur tool for the base, then I used the smudge tool to push/pull the black to create wrinkles and smudges in the makeup so it looks more real. I know it's a bit vague but I hope this helps a little! Good luck! ----- Yesterday I made another one for a friend, so I wrote down the instructions as I went. Hopefully they aren't quite as vague as the above. Using pen tool, I draw a filled shape where I want the scars to be, each section of scar is it's own layer, so I can edit it as I need to. (I had 2-3 sections on each side, plus the scar in the middle of the lip is 2 sections). Then I choose what color I want the fill to be. To do this use the eyedropper tool and pick a section of skin near the scar area. Next, I go to the FX 'tab' and click on 'bevel and emboss'. Then I play around with the different things I can do with it until I am happy. Some of the scars need Inner Bevel, some Outer. Smooth 'technique', or 'chisel hard'. I just play around with it, changing the lighting angles (always UN-check "Global Lighting"), and playing with opacities and sizes and what-not. Then, when it's close to where I want it, I rasterize the layer and blend it with either the blur tool or the smudge tool, depending on what is needed. Sometimes I have to use the burn tool to make sure the shadows are dark and crisp enough. Once I finish all the scars, I merge the layers together and save it. Just to be safe, let's not merge them with the 'base' layer - the guy's face. Now, to paint his face white - I found a MUCH better way to do it than I was doing it before. Create a new layer, then select the paintbrush with white color. Cover his entire face in white, then change the 'fill' to 50%-ish. Move the white layer to behind the scars. Now erase around his hairline, showing a little skin there, his eyes, and his mouth, and a little under the scars (if you notice the real joker's white doesn't completely touch the red in all areas). Use the blur tool to pull the white down onto his neck and to soften the edges around his ears and around the hairline. Now for the mouth. Create a new layer. Use a bright red to draw a very simple shape on his lips and on most of the scarring. Leave the little scar below the bottom lip, and in general any scar 'wrinkles' that are not directly in the shape of the 'smile' don't have much, if any, red on them. After you have done the basic color, clean it up with an eraser tool. Now darken the red color on your brush to a burgundy and add a little bit of shading along the lips and scars to make it look more realistic. Lighten the 'fill' just a hair to allow natural shading to show through, then move the layer behind the scar layer. Change the scar's 'fill' to very light - about 60% or so, so that they still show but do not overtake the red color. Use the smudge tool to pull out more creases or scar-lines on the 'scar' level. For the eyes: again create a new level. Use a the pen tool to draw the black around his eyes and following his eyebrow - the Joker doesn't have eyebrows so you will want to try to 'hide' eyebrows as much as possible. Make the black a little smaller than you think it needs to be because you will be adjusting it. With the smudge tool, pull out a few very thin lines to create creases. You can also pull the white into the black to make the creases thinner. If they appear too sharp, use the blur tool gently on them. Now you should have a Joker look-a-like! |
| Reply with Quote Reply | |
| Sep 25th 2010 | #200350 Report |
|
Posts: 1 |
how do you move the white layer behind the scars
|
| Reply with Quote Reply | |
| Page: 1 | Back to top |
| Please login or register above to post in this forum |
| © Web Media Network Limited. All rights reserved. No part of this website may be reproduced without written permission. Photoshop is a registered trademark of Adobe Inc.. TeamPhotoshop.com is not associated in any way with Adobe, nor is an offical Photoshop website. |