 |
|
Reviews, updates and in depth guides to your favourite mobile games - AppGamer.com
|
|
How to Rip BD/ DVD and Convert Video to DivX, MP4, AVI, 3GP, MPEG, FLV, etc. |
|
| Page: 1 | Reply |
| Oct 17th 2010 | #200508 Report |
 Posts: 1 |
Blu-ray Disc was developed to enable recording, rewriting and playback of high-definition video, as well as storing large amounts of data. It also offer more than five times the storage capacity of traditional DVDs and can hold up to 25GB on a single-rayer disc and 50GB on a dual-layer disc. This extra capacity combined with the use of advanced video and audio codec will offer consumers an unprecedented HD experience. Many people want to enjoy BD/ DVD and video on their iPod, iPod Touch, iPod Nano, iPhone, Apple TV, PSP, PS3, Zune, Xbox 360,etc. But they often get difficulties in this process because their portable devices usually can not support BD/ DVD and other video formats. With the release of Tipard Blu-ray Converter, all of the problems are gone. And now, this Blu Ray Converter is upgraded. The device driver is changed from the previous Anydvd into the present Passkey. Passkey is free. So you can use this converter more convenient. Now let me show you how to use this powerful software step by step: Firstly: Download and install Tipard Blu-ray Converter. 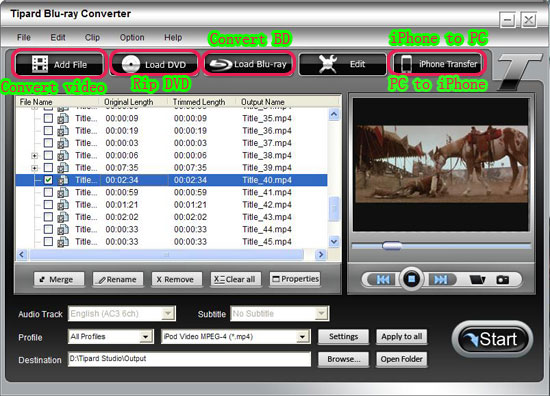 Step 1: Click “Load Blu-ray” button to load your BD. Step 2:Select the output video format you want from the “Profile” drop-down list. Step 3:Click the “Start” button to begin your conversion. See, just a few clicks, the conversion will be finished fast. There are some useful editing functions. Show you as followings: 1: Set video effect. Click “Effect” to adjust the video Brightness, Contrast, Saturation and Volume for you to get the perfect playing effect.  2: Trim any clip of your video. You can get any clip of your video by just using the “Trim” function. You can click the “Trim” button and a dialogue pops up. You can set the Start Time and End Time or just drag the slide bar to the position you want and start conversion then you can get the clip. 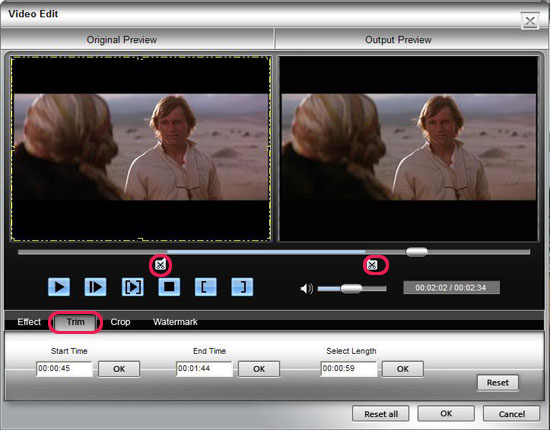 3: Crop video a. To crop your movie video, you can just drag your mouse cursor from four sides and four angles. Crop by setting the crop values b. There are four crop values on the lower right part of the crop window: Top, Bottom, Left and Right. You can set each value to crop your movie video, and the crop frame will move accordingly. 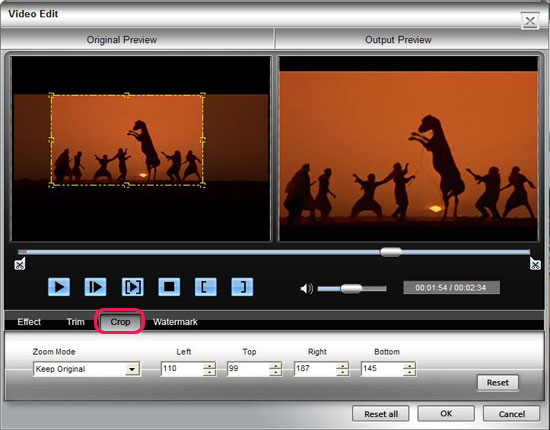 4: Add text or picture watermark. If you would like add text or picture on your video, you could do it by watermark function. Just like the picture below: 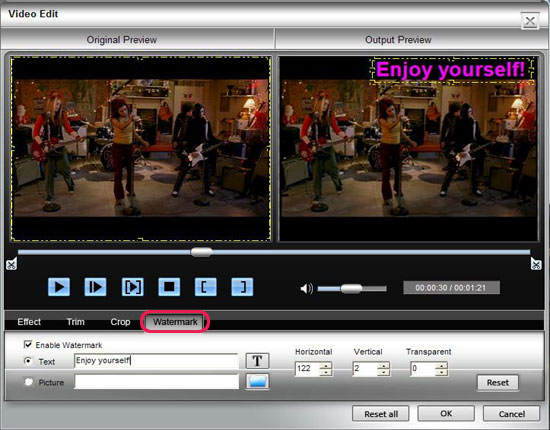 5: Capture your favorite picture. If you like the current image of the video you can use the “Snapshot” opinion. Just click the “Snapshot” button the image will be saved. 6: Merge videos into one file. Just click the “merge into one file” option if you want to merge some chapters or titles into one file. As default the merged file is named after the first selected file (either a title or a chapter). Tipard Blu-ray Converter is the professional Blu Ray Converter to convert blu-ray disk or blu-ray m2ts files to DivX, MP4, AVI, 3GP, MPEG, FLV, etc. and high-definition formats (H.264/MPEG-4 AVC, AVCHD, HD WMV, TS). Moreover, this blu ray converter also works as common video converter and DVD ripper for you to rip DVD and convert video files to any others, with the fast-converting speed and high quality. Apart from converting video files or BD/DVD, it also can create and transfer iPod/iPhone files with the iPod Transfer. So what are you waiting for! Just come to try it! |
| Reply with Quote Reply | |
| Oct 18th 2010 | #200516 Report |
|
Posts: 2 |
This guide shows you how to rip DVD to MP4, AVI, MP3, WMV, WMA, FLV, MKV, MPG, RM, 3GP, etc by using Aiseesoft DVD Ripper. Step 1: Install and run Aiseesoft DVD Ripper Step 2: Import DVD Place the DVD into your DVD drive and click the “Load DVD” button to load DVD. Tips: This DVD Ripper can load three DVD source, you can load your DVD from DVD drive, DVD folder in your PC and also IFO file. Step 3: Video settings Select the output video format you want from the “Profile” drop-down list.  Tips: 1: You can also select Audio Track and Subtitle from their respectively drop-down list. 2: If you like the current image of the video you can use the “Snapshot” opinion. Just click the “Snapshot” button the image will be saved and you can click the “File” next to “Snapshot” button to open your picture. You can select the destination of the picture by clicking the “Preference” button. As default the captured image will be saved at: C:\Documents and Settings\Administrator\My Documents\Aiseesoft Studio\Snapshot 3: If you want to merge the selected contents into one file you can check the “merge into one file” option. As default the merged file is named after the first selected file (either a title or a chapter) 4: You can click the “Settings” button to set your video parameters.  In the Video Settings, you can select Encoder, Frame Rate, Resolution and Bitrate for your movie. In the Audio Settings, you can select Encoder, Channels, Bitrate and Sample Rate for your movie. when you choose the specific settings, the lower window will show the "help" to explain the meanings of each setting. Step 4: Start conversion Click the “Start” button to start your conversion and in a short while it will be finished. Step 5: Click “Open” button to open your output destination file. |
| Reply with Quote Reply | |
| Page: 1 | Back to top |
| Please login or register above to post in this forum |
| © Web Media Network Limited. All rights reserved. No part of this website may be reproduced without written permission. Photoshop is a registered trademark of Adobe Inc.. TeamPhotoshop.com is not associated in any way with Adobe, nor is an offical Photoshop website. |